Get clean, crisp stain lines and smooth clear coats
By the DIY experts of The Family Handyman Magazine
Buying unfinished furniture

Creative staining
Turn ordinary unfinished furniture into distinctive, one-of-a-kind pieces – without blotchy, uneven staining.
The down-and-dirty truth about buying unfinished furniture and finishing it yourself is that it won’t save you much money. In fact, you may be able to find finished pieces at about the same price as an equivalent-quality raw piece. So why bother? The big advantage of doing it yourself is you can custom-finish a piece of furniture to match existing furniture and color schemes. You can also choose exotic colors or combine several colors on a single piece.
This article will tell you how to select unfinished furniture and give you tips on staining and applying clear finishes. We also show how to disassemble furniture and apply contrasting stains to create an artful and appealing piece.
Choosing wood types
Most of the unfinished-furniture stores will carry many styles in maple, pine, oak and alder. Every piece we looked at was labeled with the name of the wood it was made of. If you’re trying to match a piece of your furniture and are unsure of its wood type, take a drawer front or door to the store with you and ask.
Different woods take stains differently, an important factor to consider when selecting your furniture. Stained furniture is often displayed in showrooms. If they don’t have stained furniture on the floor, they’ll probably have a variety of stain samples on different types of wood to help you envision a finished product.
How to find good unfinished furniture
When we went out shopping for the dresser featured in this story, we were surprised at the range of quality. If you have more than one unfinished- furniture store in town, it pays to shop around, snooping for the small details that give away poor craftsmanship. We noticed chipped veneer around the edges of the top of almost every piece at one store. It indicated a poor job of applying edge-banding (the thin veneer hiding the plywood core on the edges of tops) and sawing.
Don’t bother looking for large pieces of true solid wood on hardwood pieces. Practically every piece of furniture made today uses veneered particleboard on larger surfaces such as cabinet sides and tops. However, you should expect to see solid wood on the legs and exposed framework. If the company is chintzing out by using particleboard for these elements, look elsewhere. Once you decide on a piece, ask the salesperson to see the one you’ll actually be taking home. Its quality may not match the one displayed, and you should inspect it in good light for flaws and workmanship. Examine doors and drawer fronts for how well they line up with their neighbors. If you see uneven gaps and crooked lines, you can be sure there’s plenty of poor craftsmanship you can’t see.
Can you take it apart?
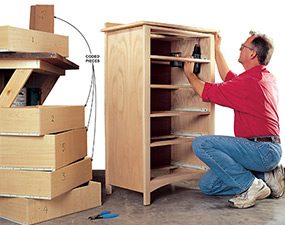
Photo 1: Disassemble furniture
Number parts in inconspicuous locations to make sure you can get them back together with their original partners. For example, mark the top drawer front and its drawer with a “1.” Mark parts for right and left or front and back orientation.
To get clean, crisp finishes with different stains on different components, you have to be able to take the furniture apart. It’s nearly impossible to stain adjacent boards different colors because it’s impossible to keep the stains from bleeding. Here are the components that generally are removable:
- Drawer fronts are screwed from the inside of the drawer. Sometimes manufacturers use small nails to hold the drawer front on straight while the screws are installed. After unscrewing the drawer front, pry off the drawer to free the nails, then pull them out with a pliers.
- Tops of nearly every piece of furniture are attached from the underside with screws. Pull out and remove top drawers and look under tabletops to see if it has these screws.
- Legs may be bolted or screwed to skirts (the vertical trim board under tabletops). You can spot these screws by looking under the tabletop.
- Skirts are usually screwed onto tabletops from underneath.
CAUTION!
Immediately place used oil-soaked rags in a flame-proof, water-filled container to prevent spontaneous combustion!
Sanding techniques that guarantee a fine finish

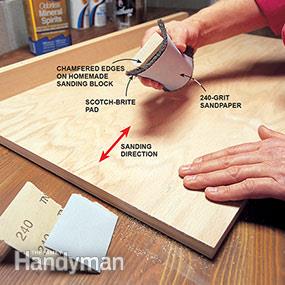
Photo 2: Hand-sand the pieces
Sand the surfaces with fine-grit sandpaper to remove fingerprints, standing grain, shallow scratches, burrs, dirt and surface blemishes. Feel the surface with your fingertips to find rough areas.
While you may be tempted to dig out the random or orbital sander, resist the impulse! An electric sander greatly increases the chances of sanding through veneers and you’ll give up the meticulous, tactile advantages of hand sanding.
Lightly sand all parts (with the grain) with 220- or 240-grit sandpaper using a cork, rubber or custom block made to fit your hand (see Photo 2). Use a raking light (a light held at a low angle to the surface) and your fingers to find rough areas. You’ll be sanding not only now but between each clear coat too.
All sanding should be performed in an area away from the finishing area. If that’s not possible, wait a few hours between sanding and applying coats of finish to give the airborne dust particles a chance to settle.
Don’t oversand! There is little to be gained by sanding until you have a baby’s butt smoothness on the wood. Also, veneer surfaces are very thin, so it’s easy to sand through the surface and expose the plywood or particleboard surface underneath. Most finishes will level out as well on a surface sanded with 220-grit paper as one done with finer grits.
Mix, test and experiment with stains first

Test the stains
Experiment with stains and practice application techniques on a piece of wood of the same species and prepared exactly the same as the furniture to be finished. For custom colors, make sure to mix enough to finish the whole piece of furniture because you’ll never be able to get an exact match if you come up short.
To avoid getting stuck with a color or effect you don’t want on your furniture, test, test, test. Use a scrap of wood that’s the same species as your furniture. Sand it with the same grit sandpaper and use the same application methods you intend to use on the furniture. Veneered areas may take stain differently than solid ones, so it’s important to try your techniques on each. If you’re careful, you can experiment on hidden parts of the furniture like the backside of drawers, but remember that the perimeters and edges may be exposed after reassembly. The safest course is to pick up a 2- or 3-ft. piece of wood of the same species at a lumberyard.
Choose the right clear coat for the job
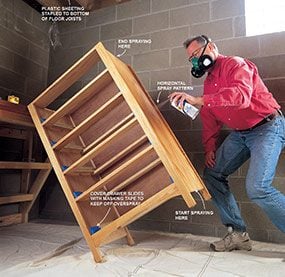
Photo 6: Apply thin coats
Spray lacquer on surfaces by starting the spray off the work and then moving it over the surface and off the other side before taking your finger off the trigger. Allow a few hours before sanding and recoating. If you’re not in a hurry, it’s easier to sand if you allow overnight curing. Remember that several thin coats are preferable to a couple of thick ones. Always vacuum and use a tack cloth on the surface before the next coat.
The top of a dresser calls for a durable, water- and scratch-resistant clear coat to protect it from condensation from water glasses and scratches from those Old Spice bottles. With its tough, easy-to-apply properties, polyurethane is the perfect answer. Once you decide on polyurethane, the next step is choosing between water- and oil-based.
Water-based (the stuff we used; Photo 7) is environmentally friendly, dries fast and is almost odor-free. It also won’t yellow over time as oil-based poly has a tendency to do, although the yellowing is sometimes desired to give the furniture a more aged look. The downside is that it isn’t as tough as oil-based poly, and can leave a milky hue to the finish, which is most visible on darker stains. Oil-based poly, on the other hand, takes longer to dry, so airborne particles have a longer time to settle on and mar the finish. But you do have more time to apply it to large areas and work out brush strokes and runs.
To enhance the grain, we oiled the surface before finishing the non-stained areas. Our oil was a store-bought mix of tung and linseed oil. If you choose to oil, read the can to find out how long to let the oil cure before subsequent finishing steps. We chose canned spray lacquer for the sides, drawer fronts and framework because it’s an easy-to-apply, good-looking finish. It’s not particularly durable or scratch-resistant and doesn’t stand up to water very well, but these parts of the dresser aren’t usually subjected to those insults. Three light coats of lacquer should be enough for a nice finish. Sand between coats with 280-grit sand paper. If you’d like a smoother finish, rub out the final coat with very fine steel wool.
CAUTION!
When applying lacquer, wear a respirator with organic vapor cartridges and a paint spray prefilter.
Use the right brush in a clean work area
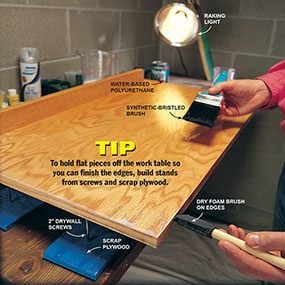
Photo 7: Use a good brush
Brush polyurethane surfaces with a high-quality brush. Start with the edges and work your way toward the middle. Drag a dry foam brush over edges after brushing on polyurethane to prevent and fix sags and runs. Use a raking light to highlight surface irregularities. Remove edge buildup with short, light strokes toward the edge.
Use a clean, medium- to high-quality brush for brushed finishes. Select a synthetic-bristled brush for applying water-based finishes and a natural-bristled brush for oil-based finishes.
The key to a good finish is cleanliness. That means the brushes, the furniture, the work area and you have to be clean. Dust from the air, your dusty clothes, or the floors and ceiling can ruin the finish or cause a lot of unnecessary additional sanding. Clean the furniture after any sanding with a soft-bristled vacuum cleaner nozzle and a tack cloth (a soft, sticky cloth you can buy at paint stores).
Water-based polyurethane sets up very quickly, giving little time to work the surface. Two or three brush strokes per area is all you should allow yourself for a smooth surface, and make the final strokes go with the grain. Just make sure there aren’t any runs or sags, especially on edges (Photo 7). Allow the finish to dry overnight and sand with 240-grit paper. Apply a second coat, allow it to dry overnight and lightly sand again. If desired, apply and sand further coats to achieve an even smoother finish.
Vietnam Plywood
Vietnam Film Faced Plywood

