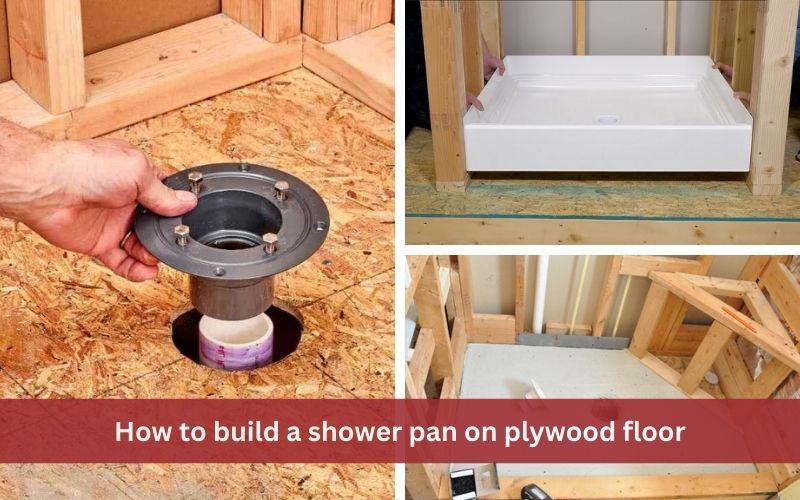
How to build a shower pan on plywood floor: A Step by step guide
In this article, you’ll learn how to build a shower pan on a plywood floor step-by-step. From prepping your subfloor to applying a waterproof membrane and installing cement board, this guide will help you create a solid, leak-proof foundation for your shower. Can you put a shower pan on plywood?…
A plywood subfloor will carry a shower pan. But only if three details line up. The plywood under the pan is structurally sound — ideally 3/4-inch tongue-and-groove on 16-inch joists, no flex underfoot. The waterproof membrane runs continuously from the pan up the walls at least six inches. Cement board sits flat on top, mechanically fastened. Get any of those wrong and the shower fails at the seams. Usually two to four years in. Order matters as much as materials. Subfloor first. Waterproof membrane (RedGard, Schluter Kerdi, or sheet equivalent) second. Cement board third. Pan or pre-slope mortar bed fourth. Number-one shortcut is skipping the membrane. That's also the number-one reason shower pans leak in the first three years.
Can you put a shower pan on plywood?
Yes. Provided the plywood is sound, the assembly is waterproofed properly, and the pan sits on the right substrate. Plywood is the standard subfloor in most US wood-framed bathrooms. Both prefab acrylic pans and custom tile-ready pans get installed over plywood every day. The work that decides whether the install lasts a decade or fails inside three years happens between the plywood and the finished surface.
How to build a shower pan on plywood floor
Gather tools and materials
Pull everything together before you start. Mid-job trips to the hardware store are how installs end up out of square or partially waterproofed.
- Measuring tape, level, utility knife
- Mortar mix or pre-slope shower pan kit
- Cement board (HardieBacker or equivalent)
- Waterproof membrane — liquid (RedGard, Hydro Ban) or sheet (Schluter Kerdi)
- Trowel, screws, waterproof seam tape, sealant
- Shower drain assembly matched to the pan or membrane system

Prep the plywood subfloor
The subfloor under a shower has to be dead solid. Walk it. If anything moves underfoot, fix it before you touch the membrane.
- Clean, dry, free of debris — no nails standing proud, no glue ridges, no sawdust.
- Structurally sound — replace any soft, swollen, or stained sections back to a sound joist.
- Properly fastened — screws (not nails) into joists at 6-inch centres around the perimeter and 8 to 12 inches across the field.
- Sloped if the design calls for it — pre-sloped mortar bed pans need the slope built into the underlayment, not the membrane on top.
Apply waterproof membrane
Waterproofing is the part that decides whether the assembly lasts. Two ways to do it.
- Liquid membranes — roll or brush on multiple coats. Each coat must dry fully before the next goes on. Aim for the wet-mil thickness shown on the can. Thin coats fail.
- Sheet membranes — cut to size, bond to the plywood with thin-set or the manufacturer's adhesive, seal seams with waterproof seam tape and pre-formed inside corners.
Run the membrane up the walls at least six inches. Eight is better. The horizontal-to-vertical transition is where leaks start.
Install and finish cement board
Once the membrane is dry, the cement board goes on top:
- Install cement board over the membrane on the floor and up the walls inside the wet zone.
- Leave a 1/8-inch gap between sheets and at wall junctions. Fill seams with alkali-resistant fibreglass mesh tape bedded in thin-set.
- Screw down at the manufacturer's spacing — usually 8 inches in the field, 6 inches around the perimeter.
- On the floor, do not penetrate the shower liner or waterproof membrane with screws. Bond the cement board with thin-set instead, or screw only outside the wet area.
Final tip
Tiled showers need a sloped mortar bed over the waterproofing and under the tile. Typically 1/4 inch of fall per foot toward the drain. Local plumbing code dictates drain type, weep hole requirements, and clamping ring details. Read the membrane manufacturer's instructions and the code before you set the first tile.
What to Know Before Installing a Shower Pan on Plywood
Inspect the plywood subfloor
Look at the plywood before you commit. Soft spots, dark stains, swollen edges, visible mould — all signs of past water damage that need cutting out and replacing before any new install goes on top. A subfloor that flexes underfoot will crack tile and eventually crack a fibreglass pan as well. Sister joists or add blocking if the deflection is in the framing rather than the panel.

Use a mortar bed or leveling compound
Most pan installs need a thin layer of mortar between the pan and the plywood. The mortar fills small dips, gives the pan continuous support, and stops the pan from rocking under load. Skip this step and you crack fibreglass pans and pop grout joints in tile pans within a year or two.
Waterproofing is critical
The pan handles water inside its perimeter. The surrounding floor and the wall-to-pan junction need their own waterproofing. A bead of mildew-resistant sealant where the pan meets the wall isn't optional. It's the last line of defence against splash water working into the framing.
Follow manufacturer instructions
Tile-ready pans, fibreglass pans, and acrylic pans all have different install requirements. Adhesive type. Mortar bed thickness. Drain compatibility. Fastening pattern. Every detail varies by manufacturer. The instruction sheet that ships with the pan is the controlling document. If it conflicts with general DIY advice (including this article), follow the sheet.

A shower pan on plywood works when the underlying assembly is right. Sound subfloor. Continuous waterproofing. Flat, well-fastened cement board. Pan installed to manufacturer's instructions. Get those four right and the shower will hold up to a decade or more of daily use without leaking into the framing below.
VINAWOOD – Vietnam Plywood Supplier Manufacturer